|
Subscribe to this site's News feed via RSS:

Our partners:

|
Generating Printer Profiles
To get a custom profile generated, you will need to print out the test pages contained in
this ZIP file.
The ZIP file actually contains three TIFF files: two 7x10-inch images for profiling most printers (these typically get printed on two A4 pages), and one
file for use in profiling CD/DVD printers (this has fewer colour patches than the full targets).
If your printer can't print these sizes (e.g. a "postcard" printer)
please contact us to sort out a customised set of target files.
The test pages need to be printed in a specific way, so the detail of these instructions is very important!
They refer to Photoshop, but if you use different colour-managed software you should be able to
translate the instructions.
These instructions refer to the printing of the 7x10-inch targets for "normal" printers.
If you're profiling a CD/DVD printer you should understand the information on this page and
then proceed to our page about printing on CDs.
|
1.
|
The printer nozzles must be clean.
Run a cleaning cycle, print a nozzle check, and repeat until clean!
| |
2.
|
Some printers (e.g. Epson inkjets) allow you to check their alignment through the printer utility software.
You should check the alignment before proceeding.
| |
3.
|
 Each of the test files must be printed as-is.
Load them up into Photoshop: when they are opened Photoshop should tell you that the file is not
tagged with a profile and ask you what to do with it.
Select Leave as is (don't color manage).
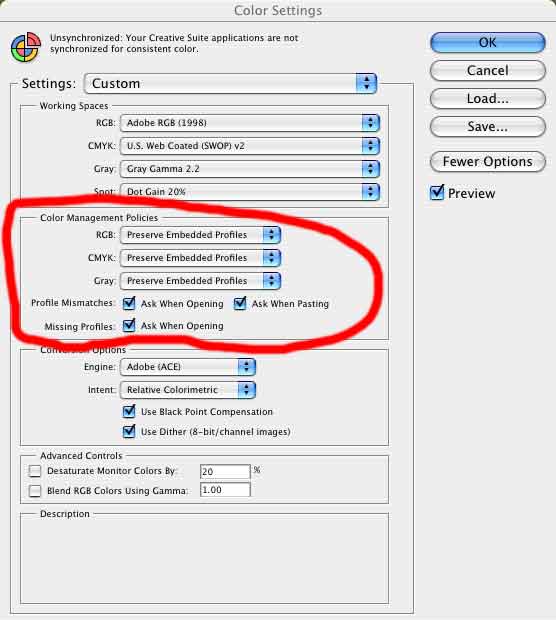
If Photoshop does not present you with this prompt, you should check the Photoshop Color Settings and make
sure it's set as per this example:
These are good defaults for general use: Preserve Embedded Profiles is particularly
important, as is Missing Profiles.
You might decide to turn off the Profile Mismatches options once you're familiar with them.
| |
6.
|
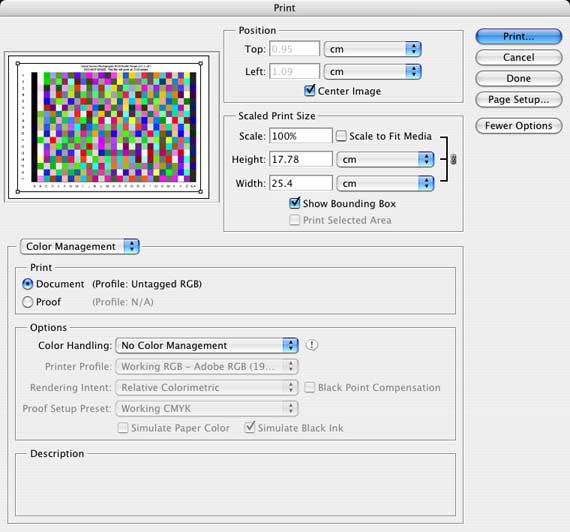
 Choose Photoshop's Print with Preview.
Make sure Scale to Fit Media is NOT set: the file must be printed at its native size.
This window may look slightly different based on your version of Photoshop, but the basic details are the same.
Under Options it is important that No Color Management
(or Same As Source) is selected.
| |
4.
|
Now proceed through the Print option, which will bring up the normal printer driver dialog.
| |
5.
|
The driver settings will need to match those you will use with the profile.
The first setting to check is the paper type, as it affects how much ink of each type the printer
will apply to the paper.
The resolution (dpi) and associated settings (e.g. "MicroWeave") need to be set appropriately.
| |
6.
|
Color Management must be turned off in the driver: for the profile to work the driver should not be
applying further manipulation to the colours.
The Epson drivers typically have a No Color Adjustment option although you may have to
explore the Advanced windows or ICM with some drivers.
| |
7.
|
If you are printing with an Epson printer that uses a Gloss Optimiser ink (e.g. R800/R1800) please
ensure you print the profile target with the Gloss Optimiser turned off, even if you will
print actual images with it on.
Unfortunately the reflections of the gloss optimiser can interfere with the photospectrometer's
internal light source, introducing a colour cast to the profile. It may seem counter-intuitive,
but you will get an accurate profile by turning it off when printing the targets, and then turning
it on for your actual printing.
| |
8.
|
All these settings are important - make note of all the settings you've applied!
If you are using a Mac you can save a Preset within the Print dialog which will allow you
to recall all these settings with a simple click (update the Preset later with the appropriate
Gloss Optimiser setting).
| |
9.
|
Print both files.
Record the paper type, printer model, driver settings, etc in print on the white border of the prints or on the reverse.
Optionally also note your preferred profile name (see the example further below).
Be very careful to not mark any part of the colour targets!
| |
10.
|
Let the pages dry.
Some papers (especially gloss ones) can take at least a day to stabilise and finish evaporating glycol from the inks.
Once they're "dry to the touch", stacking the pages with a sheet of plain blank paper on top of each one is a good idea
(the blank paper acts as a sponge: discard/recycle it when you're done).
| |
11.
|
If you are intending to use different paper types, repeat the above process for each paper.
| |
12.
|
Post the pages (with payment [AU$60 per profile] and details of your email address) to us at:
|
David Burren Photography
PO Box 3800
Middle Camberwell
Vic 3124
|
It's best to package them unfolded with some stiff cardboard in a (C4) envelope with interleaved blank paper "sponges".
|
When we receive your prints and payment, we analyse the prints and generate an ICC profile for each paper which we email back to you.
This is usually done within 24 hours, although if we are travelling it may take a few days longer.
When you receive the .ICC files by email, you need to install them into the appropriate directory for applications like Photoshop to find.
On most Windows systems you can simply right-click on the file and select Install.
On OS X (Mac) you should put the files within the <home>/Library/ColorSync/Profiles/ directory.
If you are using a Photoshop version earlier than CS2 you will have to restart Photoshop so that it picks up the new profile.

That's it! You now have an accurate custom printer profile.
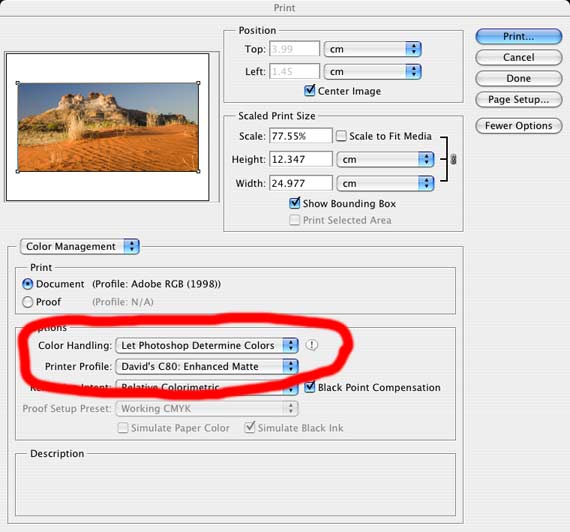
When printing a file, use the Print with Preview function again, but this time don't select No Color Management.
Use Let Photoshop Determine Colors, and specify the appropriate printer profile.
Be sure to use the same printer driver settings as you used when generating the profile!
Note that the profile name in this case is "David's C80: Enhanced Matte".
Choosing logical names (not too long!) can help you find the relevant profiles in the long list that Photoshop provides.
I also have saved a print driver Preset named "C80 Enhanced Matte" (not visible in this screen grab)
to make finding the appropriate printer settings easy.
|


