|
|
|
Subscribe to this site's News feed via RSS:
Our partners:
|
Digital IR Choices
| ||||||||||||||||||||||||||||||||||||||||||||||||||||||||||||||||||||||||||||||||||||||||||||
|
|
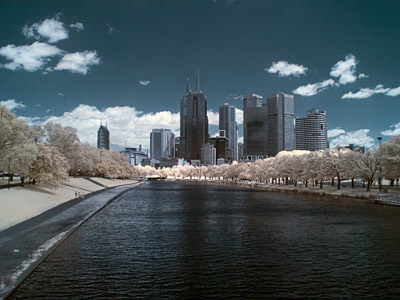
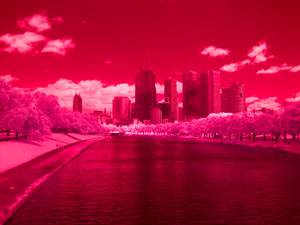
Melbourne and the Yarra River Canon G3/R72 Red/Blue channels swapped, levels adjusted 1/160s, f/5.6, ISO 50 |
With film-based photography, if you want to take infrared (IR) photographs you use two tools together:
With digital photography the tools we can use are very similar.
But unlike rolls of film, the sensors in our cameras are fixed in place.
So dropping in an IR film isn't quite that simple.
In fact, while the sensors are generally sensitive to IR wavelengths as well as
visible light, the IR light confuses the way the cameras capture visible colour
(with tiny red/green/blue filters over alternate pixels in a "Bayer" array, or
one of several other combination of colour filters: generically referred to as
the colour filter array - CFA) and
so an extra IR-blocking filter is installed immediately in front of the sensor
(in cameras with an anti-aliasing filter, the IR-blocking filter is usually
integrated into that piece of glass).
So simply putting an IR filter in front of the lens will not produce the same results as with film. But this is about all you can do without modifying the camera and removing the internal IR-blocking filter.
This page is an attempt to outline most of the technical issues involved with digital IR photography. Hopefully it will help you make the right choices when deciding what equipment/conversion you want, either from me or from other suppliers.
|
|
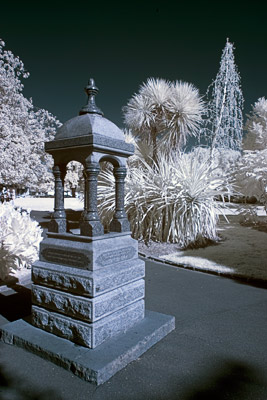
Alien Parkland Canon D60/R72, 17mm Red/Blue channels swapped, levels adjusted 1/80s, f/10 @ ISO 100 |
The filter most people discuss using is a Hoya R72.
This lets in IR light all the way up to the edge of visible red.
Some people use darker filters such as the Wratten 87 series that start letting
light through at much longer wavelengths.
Either way, with the camera's internal IR filter in place, most of the light
that makes it through the IR-pass filter is blocked before it reaches the
sensor. But the R72 filter will result in more light getting through than an
87.
The result is a very "slow" camera, often needing exposures of 15+ seconds even in daylight. Usually handheld photography is not practical. Your ability to photograph moving objects is rather restricted, and this can include subtle things like wind-blown foliage. The long exposures often contribute to significant levels of image noise.
| SLR cameras | |
|
With an IR-pass filter on the front of the lens it's impossible to see anything through the viewfinder. Thus composition and focus needs to be done with the filter removed, and then attach the filter prior to the exposure. At the same time the lens focus needs to be manually adjusted slightly to accomodate the different focus distance of IR light. Metering is somewhat haphazard: if the metering sensor can cope with the very low light levels (making sure the eyepiece is covered to stop extra light throwing off the calculations!) then it may work, but the best results are typically achieved with manual exposure and a bit of trial and error. The DSLR camera's LCD and histogram provide a very useful review mechanism, but even so it typically takes a few iterations of experimentation when setting up in a new scene. Some people work around the problem of not being able to compose with the IR filter in place by using a hotshoe-mounted auxilliary viewfinder designed for rangefinder cameras. | |
| "Compact" cameras | |
|
In these cameras the focus, metering, and electronic viewfinder are all done using the main image sensor. So while the exposures will still be slow and the images noisy, composing IR images is much easier than with an SLR. | |
|
|
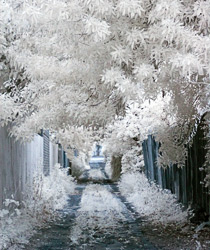
Mysterious lane Canon G3/R72 Red/Blue channels swapped, levels adjusted 1/160s, f/5.6 @ ISO 100 |
To reduce the exposure times to a reasonable level the next step is to remove the internal IR-blocking filter from the camera. However this is usually a fairly permanent operation and thus the camera becomes a dedicated IR device.
Some cameras such as the Sigma SD10 have the IR-blocking filter as a user-removeable component, but they're the exception. Some Sony cameras have a NightShot mode where the IR-blocking filter is moved aside, and these can be useful IR cameras (but deliberate firmware limitations in these cameras limit the available shutter speeds so that IR photography in daylight usually requires an external ND filter in conjunction with an IR-pass filter).
An obvious advantage of this is that shutter speeds come back to being reasonable to use handheld. You can capture action in more than just its blurred state!
The internal IR filter is usually a piece of glass several millimetres thick
and located immediately in front of the image sensor.
In cameras that use an anti-aliasing filter to avoid "moire" effects this filter
is typically part of the internal IR filter.
When it is removed the optics of the camera changes, and in order to preserve
somewhat normal focus behaviour it is important to replace it with a similar
piece of glass.
This can either be clear (in which case an external filter is still required
in front of the lens) or can be the IR-pass filter itself.
By using clear glass (which in our own conversions we refer to as a "CLR" filter) you keep some flexibility in using various filters without needing further camera modifications, but this can also be a limitation (external filters can make it much harder to control flare, which can be an important issue for IR work). There are other pros and cons to each approach, specific to SLR cameras:
| SLR cameras | |||||||||
If you want to use flashes in your IR photography then you're usually limited to manual flash metering, or TTL with a large flash exposure compensation (and a bit of a prayer). When dust gets in your camera and settles on "the sensor", the surface it's actually sitting on is the internal filter. The replacement filters we use can be cleaned in the same manner as the original IR-blocking filter (this is a good reason for not using resin, gelatin, or polyester filters inside cameras!). | |||||||||
| "Compact" cameras | |||||||||
|
With an IR-modified "compact" digital camera (where focus/metering/composition is done using the imaging sensor and an EVF or LCD viewfinder, and thus those functions are affected by the IR-pass filter in the same way as the final image) you can shoot as you normally would. No focus issues, no exposure compensation or FEC required. You just lose out on the ability to swap lenses and the lower noise of the larger sensors in DSLRs. You can use clear glass internally and use various external IR filters, but the resulting gear is much less compact and is generally much more susceptible to flare issues than having the IR filter permanently installed internally. Because all the metering/focus/etc are done using the main sensor, they're all "normal". Even TTL flash photography is easy: It Just Works. | |||||||||

|
|
Church Canon G3/87C 1/800s, f/4.5 @ ISO 100 |
Given the above observations, one might ask why you would bother using a DSLR. Each type of camera has its own benefits:
| DSLR | Compact camera |
|---|---|
|
|
Your choice of IR filter is quite important. The common choices include:
A useful interactive graph is available to put these into perspective.
We also offer another conversion ("CLR") which uses Schott WG280 glass.
This allows all wavelengths in, from UV up through visible light and well into IR.
Our Baader UV/IR-cut
conversion is intended for astrophotography use.
Choosing the right filter can be made easier if you understand exactly what they do:

|
The above graph shows the transmission profiles for a variety of filters.
Short (UV) wavelengths are on the left, and IR on the right (the visible
spectrum extends from approximately 400nm to 700nm).
The 350D and D70 lines are the profiles of the internal IR cutoff filters from
those DSLR cameras, as measured by Christian Buil and presented partway down
this page.
As you can see, the D70 filter lets through a tiny amount more IR light than
the 350D's filter.
|
Unfortunately pretty graphs only go so far, especially as our visual response to light works on a logarithmic scale rather than linear. So here's that same data on a log graph:

Whichever graph scale we use, as you can see the R72-style filters let in IR light right up to the edge of visible light (around 700nm), and has just enough overlap with the cameras' internal IR filters that it's possible to take at least half-reasonable photos with it on unmodified cameras (although with very long exposures). Removing the internal filter obviously has a big effect on the IR sensitivity of the camera!
The 87 and 87C style filters have cutoffs correspondingly further into IR, and on unmodified cameras result in very low response. Because of the interaction with the CFA filters (for example the response profiles for the EOS 350D can be seen on Christian's site) these filters usually provide a fairly monochromatic response, while the R72-style filters overlap with different CFA colours and this results in the typical false-colour images.
There are lots of factors that may affect your choice of camera. We've collected notes about many cameras which may help.

|
|
Desolate tree Canon S30/87C 1/100s, f/7.1 @ ISO 50 |
Lens flare is a constant problem for photographers (for both visible-light and IR). Sometimes it's as obvious as spots across the image, and sometimes it's as subtle as a lack of contrast.
Shielding the front element of your lens so that the sun is not shining directly onto it is a good start, but even a bright object such as a cloud bank that's out of the capture frame but still with a clear line-of-sight to the lens front element can introduce subtle flare.
Good lenses are typically designed with internal baffles, flocking (anti-reflective coatings on the baffles and the inside of the lens barrel) and anti-reflective coatings on some of the optical elements. Incidentally, the "digital" lenses (such as Sigma's "DG" series) that have emerged in recent years typically have anti-reflective coatings on the rear elements to counteract reflections from the sensor and the camera's internal filter (film was never quite so reflective). Using external filters with good AR coatings (e.g. multi-coated UV filters for protection) can help, while some photographers go so far as to avoid the use of ALL external filters.
But even with all this, pretty much all lenses benefit from the use of a good hood to shade the front element (ideally from everything that's not going to be in the final image!). This applies to IR photography just as much as to visible-light photography. If you use Canon reduced-frame DSLRs you may be interested in our article about alternate hoods for some lenses.
Just to complicate the situation, designers are typically working to produce lenses for visible-light work and it's possible that a lens with little or no flare problem with visible light may have an issue with IR. Some websites have gone so far as to collect lists of lenses with good or bad IR performance (for example this one). However, such lists should be "taken with a grain of salt". Often they're based on reports that a certain lens does not work with IR, even with sample images showing hotspots. Not only do we need to make sure that the test was done taking appropriate care (e.g. with a hood: see above) but they're often done using un-modified cameras.
With an unmodified camera using an external IR filter, you're trying to capture the IR light that the internal IR-blocking filter was designed to eliminate. It typically does this by a combination of two components: a dichroic mirror and an IR-absorption layer. The dichroic mirror reflects most of the IR light back into the lens, and this can obviously contribute to flare (normally this extra IR is overwhelmed by the visible-light, but not if that light has been blocked). With an IR-modified camera with no internal IR-blocking filter (and thus no dichroic mirror) often these flare problems disappear. Not always though: it depends on how good the design of the lens is in the first place.
There is no guarantee that all the lenses on published "bad for IR" lists will
work fine on modified cameras, but I do know of at least one report of the
Canon EF-S 18-55mm lens working fine with no IR "hot spot".
Hopefully over time we will build up better lists.
Our own experiences with IR-modified cameras have shown:
| Good for IR | Bad for IR |
|---|---|
|
Canon EF 50mm/1.8 Mk.I Canon EF 17-40mm/4 L USM Canon EF 24-70mm/2.8 L USM Canon EF 24-105mm/4 L IS USM Canon EF 100-400mm/4.5-5.6 L IS USM Sigma 180mm/3.5 EX HSM Macro (the older non-DG version) |
Canon EF 16-35mm/2.8 L USM (hot-spot) Canon EF-S 10-22mm/3.5-4.5 USM (no hot-spot, but long wavelengths "smear" at the edges) Canon EF 28-135mm/3.5-5.6 IS USM (mild hot-spot) |

|
|
Road to nowhere Canon S30/87C 1/100s, f/5.6 @ ISO 50 |
Whichever camera type you use, the effect of the IR filter on the histogram is very important to consider when you're photographing:
Whether you shoot in RAW or JPEG, it is very important to set a custom WB in
the camera. Don't trust "auto" to do the right thing with IR images!
Some cameras can display separate R/G/B histograms, but most just display
a luminance histogram which they derive from the green channel of the JPEG
(even with RAW: the histogram is generated from the small preview JPEG
embedded in the RAW file).
If the image has a significant red cast, it's possible to blow out the red
channels of the image even though the histogram looked OK.
Neutralising the colour in-camera lets you not worry about the fact that the
histogram is calculated from the green channel.
If you want to use a different WB when processing the image that's easy to
do in your RAW processor, but choosing a good WB in-camera helps the histogram!
Whichever filter you use, it's very useful to have a camera with RAW mode.
It provides a little "safety margin" in your exposures, but more importantly
it lets you choose the most appropriate white balance when examining the shot
later.
Also if you find an image is lacking enough contrast it's possible to enhance it
in the RAW conversion before the image is rendered into an 8-bit file and thus
minimise the chances of posterisation.
As I've described above, when using an R72-style filter the images you get from your camera have a strong red cast. This usually isn't very pretty, so post-processing is required. Many people use something like this:
| 1. |
The base image is extremely red: |
|
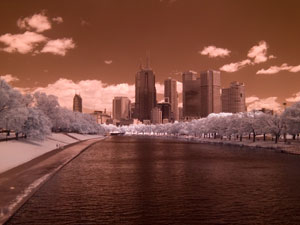
| 2. |
Using an appropriate custom white balance can take away most of this cast. Incidentally, with some cameras (e.g. D60s) the white balance is sometimes so extreme that it's outside the range of colour temperatures supported by Adobe Camera Raw or Lightroom (which are my normal RAW tools). You can use different RAW converters, but the difference is usually not that great and I manage the slight remaining cast with further Photoshop or Lightroom tools. At this point you can decide to desaturate the image to B&W or to process it into interesting false colours. |
|
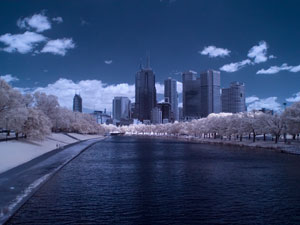
| 3. |
Once in Photoshop the red and blue channels can be swapped: |
|
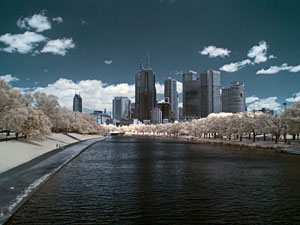
| 4. |
Levels can be used to spread the tones and neutralise some of the colour: |
|
| 5. | Some people also use the Hue control to manipulate the colour set. | |
I have recorded these steps into a Photoshop action (I've tested this in CS and CS2). Download that ZIP file, unpack it and you will find a .ATN file which you can load into Photoshop via its Actions palette menu. The action applies all its changes via non-destructive adjustment layers, allowing you to easily undo or tweak each of the changes (you can add layer masks to make the changes selective). Feel free to use it as the basis of your own experiments!
Sometimes the tonality shifts involved in this processing can be extreme, and cleaner images can be achieved with 16-bit files (an option you can choose when converting RAW files) than with 8-bit files.
For the above techniques to work, there must be areas of the image with different hues. This is generally only true with the R72-style filters. There is no point trying these manipulations on images captured with 87C filters, although in some cameras there can be slight colour variation when using 87-style filters.
|
|
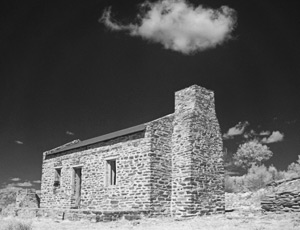
Cottage at Arltunga Canon G3/87 1/40s, f/8 @ ISO 100 |
Hopefully the information on this page will help you decide what equipment to
use if you take up IR photography, and will help you make the best use of that
equipment!
If you would like us to convert a camera for you, please check out our
IR Conversions page.
-- David Burren

|
|
Deadwood Canon D60/87C, 17mm 1/20s, f/8 @ ISO 200 (close to sunset) |
Unless otherwise noted, all text and images on this website are Copyright David Burren Photography 2000-2006 and may not be used for any purpose without prior consent.
![]()